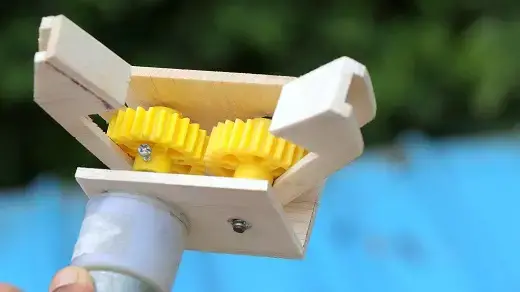
Robotic Arm That is Easy to Make
Hello creators today i'm here with detailed instructions on How To Make Robotic Arm Gripper at Home, this is one of coolest and easiest Robotic arm gripper which you can make and use for your mini projects related to design of robots. Thank me later for this cool science project idea!
What is Robotic Arm Gripper

In short it resembles Hand with fingers which we use to hold a glass of water or to lift and keep objects from on place to another( Example are just for easy understanding), But here the number of fingers varies in simple words the type of gripper varies
There are many robot gripper types i will show you easy and effective type of robot gripper design which you can attach to next robotic arm project which you are going to make! Don't worry arduino robotic arm project instructions will be coming soon on this site make sure to check back later!
Materials required for Gripper

- Geared DC Motor( i use metal geared) Low Rpm works good for this project
- Plastic Gears
- Balsa Wood or any other substitute material for frame
- Long Hex Bolt
- Super glue
- Sheet of paper, pencil to mark design and Scissors
I used balsa wood for enhanced strength you can use MDF wood, For the moment i didn't find it in my nearby place so i made with balsa wood one additional advantage is balsa is easy to work!
After you gather all the above said materials use the robot gripper design below
Robotic Arm Gripper Design

Design explanation
Draw a square of 5cm*7.5cm on a sheet of paper and cut two more piece of same measurements on balsa wood this will be holder and side casing for dc motor
Gripper design shown in second image , Cut 4 pieces of those in balsa wood
After all the above said pieces are cut we can start building gripper, Follow below visuals
Robotic Arm Gripper Making

Take gripper part and using glue stick stick the same to plastic gear, Repeat same step for other side of gear wheel
This will be one whole gripper as we need a pair make one more gripper using same method
So end of the process we have grippers ready
Now keep gear wheel on balsa wood and make adjustments so that gears are equally in place from sides
Drill a hole to attach motor
Dc Gear Motor which i used came with supporting nut to ensure firm fixing, Hence i tightened those to balsa for good coupling

Attach pre-prepared gripper to Dc Motor shaft
One end of gripper holder will be DC motor shaft, For other end i will be using hex nut, length of hex nut should be slightly larger than frame since we are tightening it from outside frame
From the above visuals assembling your robotic arm gripper is few steps away!
Most important thing you need to take care of here is make sure to pre check angle at which you will superglue gripper hands to gear wheel, Both Shouldn't be the same
Once everything is in fix attach side supports for cleaner look, Use battery to check if mechanism is working fine
That was all about Making gripper at home, all the steps were clearly explained now lets have a look on what this gripper can do
Note: Check out working video on channel
Features
- Can be used to pick and place if attach to Robot arm
- Can be used to grip materials for long time
Advantages
- Easy to configure
- Simple mechanism is involved
- Very Easy to make
- Less expensive
Disadvantages
No Feedback System in gripper, adding one would result in much more good controlling and Gripper made using steel posses high strength
Hope you will make this for your upcoming project! everything was explained in detail as it should be!
If you want to add extra points which you think i should consider let me know in the comments Box, also don't forget to check out my other projects related to science projects and arduino projects, Thank You and have a good day
westerveltprolead.blogspot.com
Source: https://letsmakeprojects.com/make-robotic-arm-gripper/
0 Response to "Robotic Arm That is Easy to Make"
Postar um comentário